Making Tables Readable & Accessible
| Column Header 1 | Column Header 2 | Column Header 3 | Column Header 4 |
|---|---|---|---|
| Column 1 Table Data | Column 2 More Table Data | Column 3 More Table Data | Column 4 More Table Data |
| Column 1 Table Data | Column 2 Table Data | Column 3 More Table Data | Column 4 Table Data |
| Column 1 Table Data | Column 2 Table Data | Column 3 More Table Data | Column 4 Table Data |
About Table Tags
To make readable, accessible tables like this example, we first need to understand a little about table tags and what they mean.
- <table> General table tag. This is the main tag that wraps an entire table and all it’s elements. Be sure to have a </table> tag at the end!
- <tbody> Table body. This should be one singular tag near the beginning of the table after the headers, and a </tbody> at the end, after all the rows.
- <tr> This stands for Table Row. This tag is used to create a new row inside a table. The end of the row is noted with </tr>
- <td> This stands for table data. This is used to denote content that will appear inside of a cell column. Use this to move to the next column of data within a row. Similar to rows, they are ended with a </td>. Think of this as moving to the next horizontal cell in a row.
- <thead> Table Header. In the example above, “Column Header 1” “Column Header 2” “Column Header 3” and “Column Header 4” are all table headers. This tag is used to set apart column titles from actual table data. Headers are particularly important for accessibility purposes, so screen readers can properly read the column titles. These cells are ended with a </thead>. There will be one group of these listed together at the top of the table.
- <tbody> Table body. This should be one singular tag near the beginning of the table after the headers, and a </tbody> at the end, after all the rows.
The elements of the table are broken down like this:
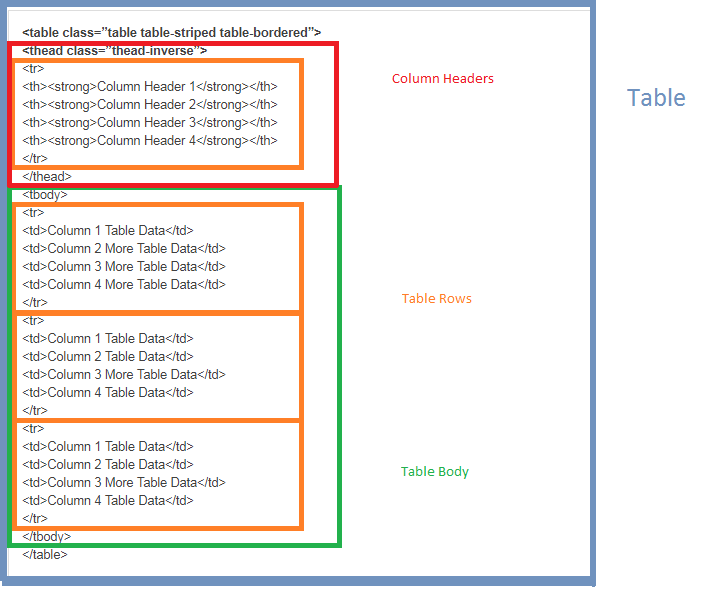
The code (in the text tab of the editor) for the table above will look like this:
<table class=”table table-striped table-bordered”>
<thead class=”thead-inverse”>
<tr>
<th><strong>Column Header 1</strong></th>
<th><strong>Column Header 2</strong></th>
<th><strong>Column Header 3</strong></th>
<th><strong>Column Header 4</strong></th>
</tr>
</thead>
<tbody>
<tr>
<td>Column 1 Table Data</td>
<td>Column 2 More Table Data</td>
<td>Column 3 More Table Data</td>
<td>Column 4 More Table Data</td>
</tr>
<tr>
<td>Column 1 Table Data</td>
<td>Column 2 Table Data</td>
<td>Column 3 More Table Data</td>
<td>Column 4 Table Data</td>
</tr>
<tr>
<td>Column 1 Table Data</td>
<td>Column 2 Table Data</td>
<td>Column 3 More Table Data</td>
<td>Column 4 Table Data</td>
</tr>
</tbody>
</table>
Adding Columns
To add a column, add a new table header inside the <thead> tag, like this:
<thead class=”thead-inverse”>
<tr>
<th><strong>Column Header 1</strong></th>
<th><strong>Column Header 2</strong></th>
<th><strong>Column Header 3</strong></th>
<th><strong>Column Header 4</strong></th>
<th><strong>NEW COLUMN</strong></th>
</tr>
</thead>
Adding Rows
To add a new row, simply add a new <tr> tag and fill it with the row’s contents, like this:
Code
<tr>
<td>Table Data</td>
<td>Table Data</td>
<td>More Table Data</td>
<td>Table Data</td>
</tr>
Action
Start a new row
Table data for column 1
Table data for column 2
Table data for column 3
Table data for column 4
End Row