Click an image to view at full size.
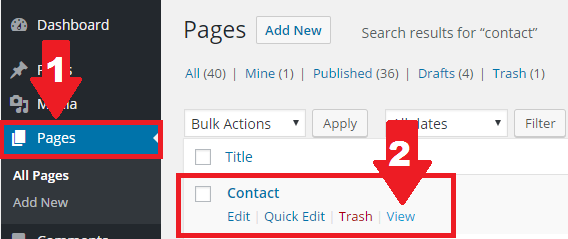
Each library WordPress site has a default “Contact” page that is set up to display the unit employee list automatically. Click “Pages” in the left navigation pane, and find the “Contact” page, if it’s labeled as “Draft”, publish the page first, otherwise the employee list won’t appear. Click “View” to see the page.
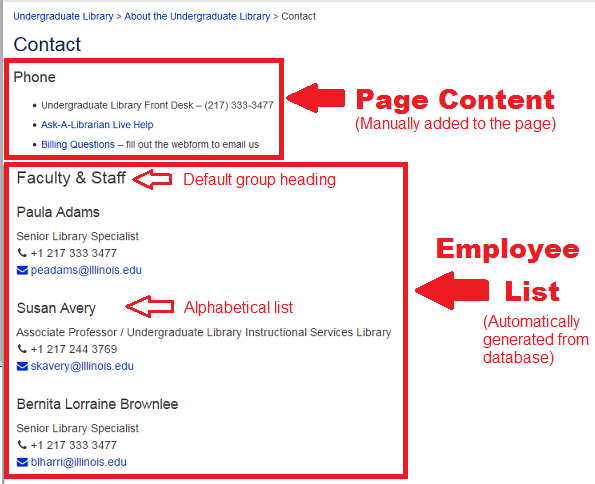
The employee list follows the page content and it may take a few seconds to load.
By default, the list is divided into two groups based on job categories:
- Faculty & Staff
- Graduate Assistants
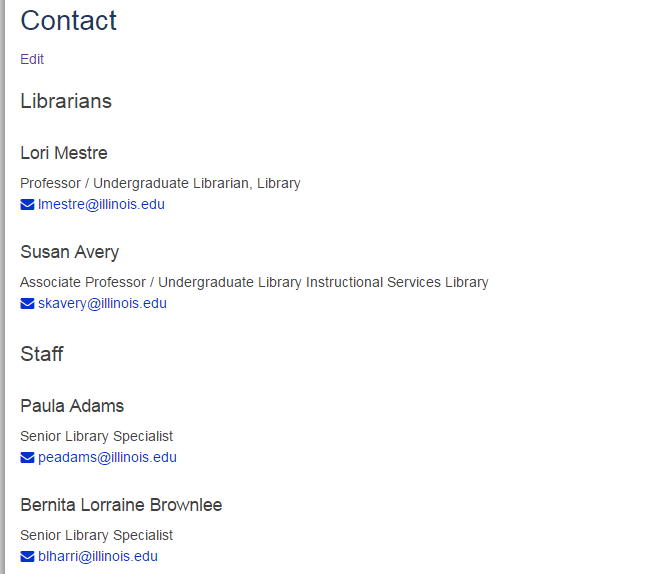
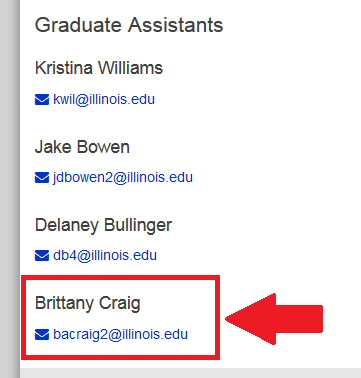
Employees are listed alphabetically by last name in each group. For example, below is what the UGL Contact page looks like initially:
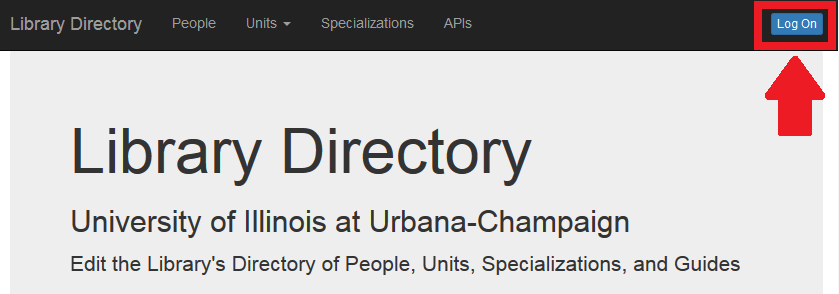
Since the employee list is automatically generated from the Library Directory database, to change how it is displayed, go to the Library Directory website and click the blue “Log On” button in the upper right hand corner.
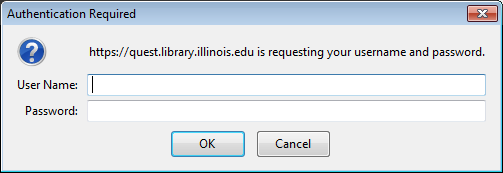
Enter your NetID and Active Directory (AD) password, then click OK.
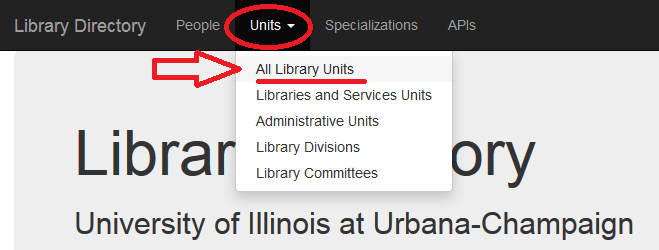
After you’ve successfully logged in, go to the top menu, click the down arrow next to “Units” and select “All Library Units“.
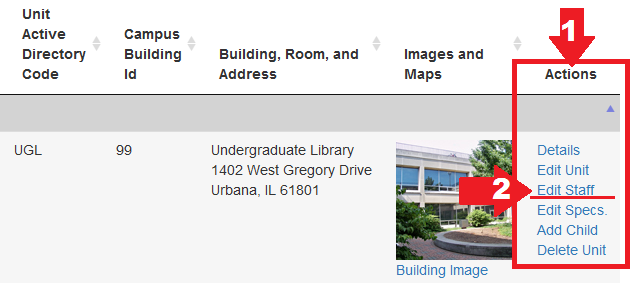
Scroll down to find your unit, or type your unit name in the search box and hit enter.

Click “Edit Staff” in the “Actions” column.
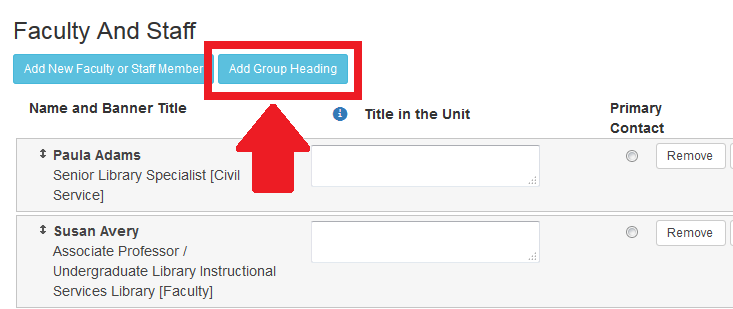
Add a Group Heading
To change the default “Faculty & Staff” heading, click the Add Group Heading button underneath it.
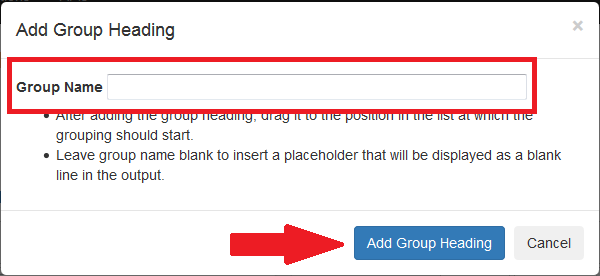
In the pop-up box, type a heading in the “Group Name” field, and click the “Add Group Heading” button.
The new heading is added at the top of the page. Repeat the above steps to add as many group headings as needed.
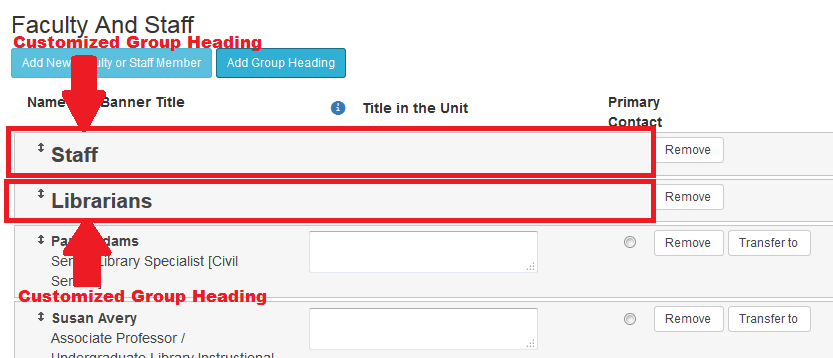
Scroll down to the bottom of the page and click the blue Save Changes button.
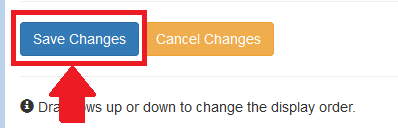
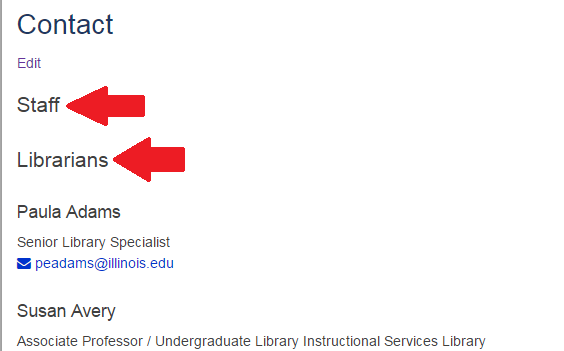
Go to your WordPress site and refresh the Contact page, you’ll see that the headings you just added have replaced the default Faculty and Staff heading.
Re-arranging the Employee List
Go to the Library Directory website, click Units -> All Library Units, and scroll down to find your unit, then under Actions, click Edit Staff. It may take a few seconds for the page to load, once it’s loaded:
- Hover your mouse over the little up and down arrow at the left end of a group heading or an employee entry.
- The mouse pointer turns into a little white hand
- Hold down the mouse while dragging the entry or heading, a yellow bar appears to show where the entry or heading will be placed
- Release the mouse when it’s at a desired location
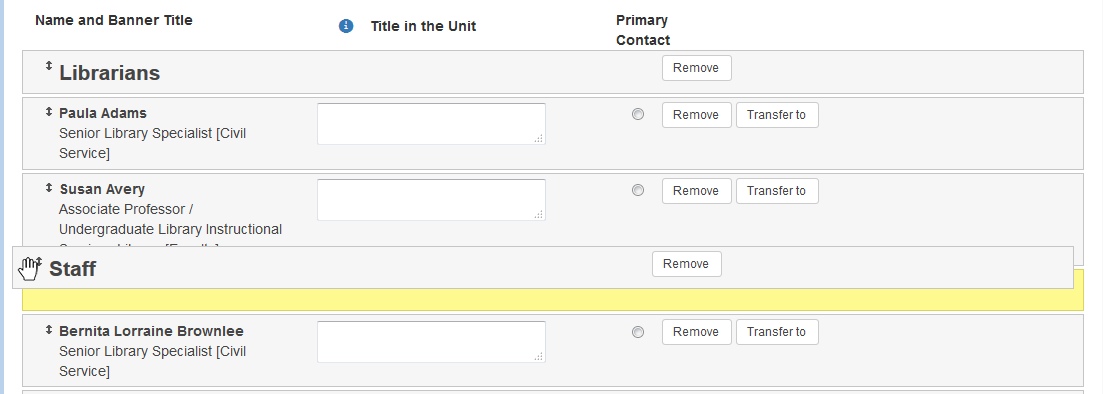
Repeat the above steps to re-organize the headings and entries until they are in your preferred order. Scroll down to the bottom of the page, and click the Save Changes button.
Go to your WordPress site and refresh the Contact page you’ll see that the changes are reflected on the page.
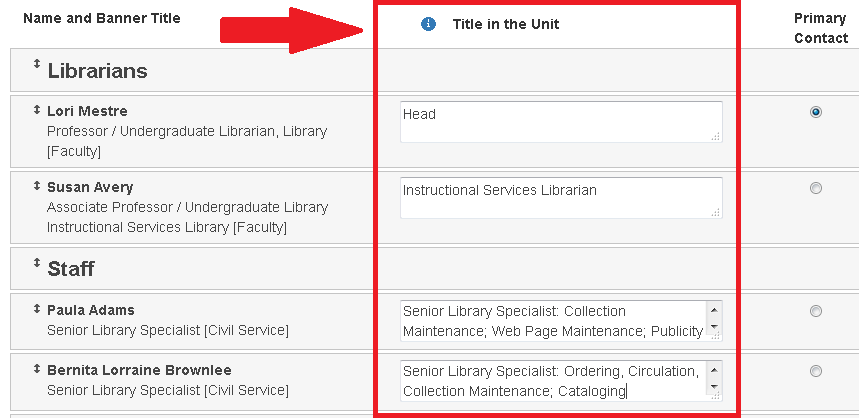
How to Edit a Job Title
The default job titles come from Banner. You can change how they’re displayed on the Contact page by entering job titles or responsibilities in the “Title in the Unit” field.
Scroll down to the bottom of the page, and click the Save Changes button.
Go to your WordPress site and refresh the Contact page, you’ll see that the job titles/responsibilities you entered have replaced the default Banner information.

To display job titles on multiple lines, separate each title with a semicolon “;”

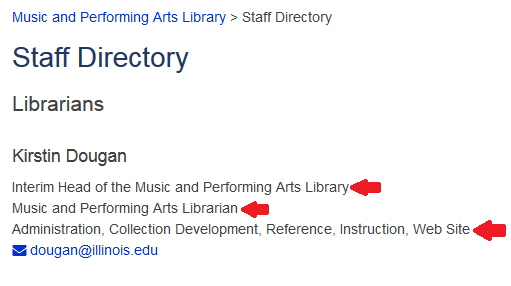
On the Contact page, each job title is displayed on its own line:
Adding or Removing People
The Library Directory displays employees whose status is active in the local database. It also checks the unit’s Active Directory (AD) groups and shows what records haven’t been added to the local database.
How to Add a Person
If an employee in your unit is not showing up on the Contact page, go to the Library Directory website, click Units -> All Library Units, and find your unit, then click Edit Staff in the Actions column.
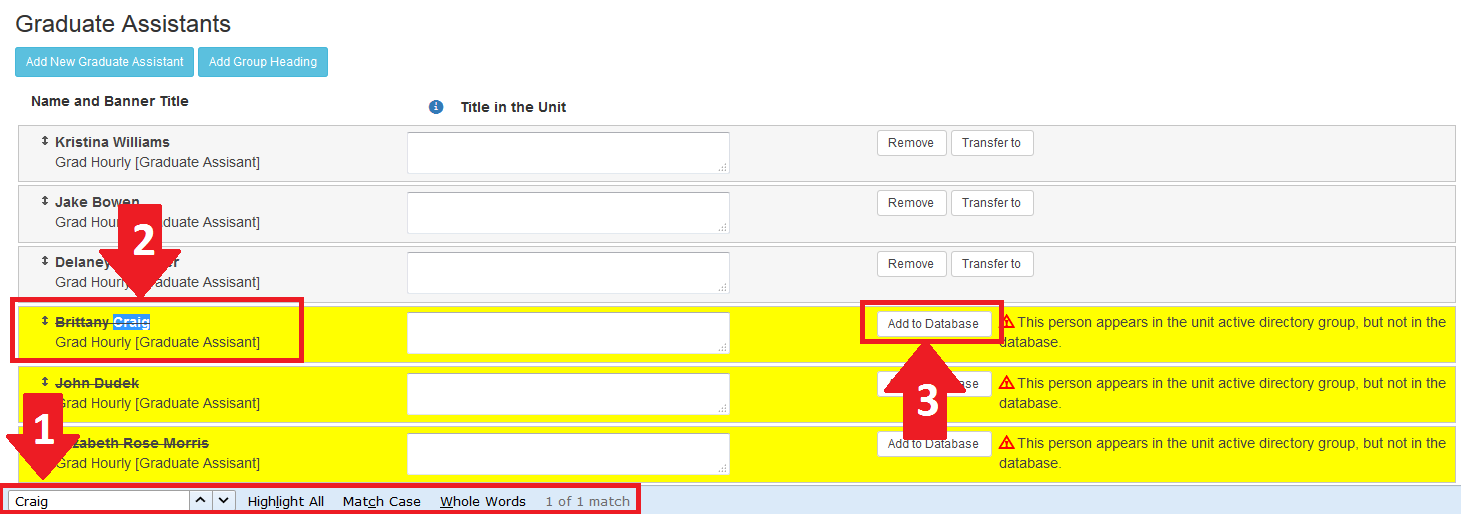
On the “Edit Staff” page, press Ctrl + F and search for the person by last or first name. If you find the person, you’ll see that his or her record is crossed out and highlighted in yellow. There will be a note saying “This person appears in the unit active directory group, but not in the database“.
Click the “Add to Database” button to add the person to the directory database.
Scroll down to the bottom of the page, and click the Save Changes button. Go to your WordPress site and refresh the Contact page, you’ll see that the person has been added.
If you can’t find the person in the Library Directory, that means he or she is not in the unit’s AD groups. Use the AD Group Manager to put him or her in the appropriate AD groups, and then follow the above steps to add the person to the Library Directory and the Contact page.
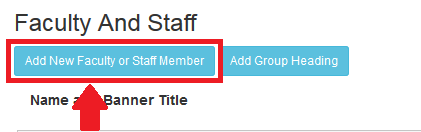
Alternatively, you can add the person directly to the directory database. On the “Edit Staff” page, under each default group heading, there is a button for adding new employees. For example, to add a faculty or staff who is in neither the unit AD group nor directory database, click the blue “Add New Faculty or Staff Member” button under the “Faculty and Staff” group heading.
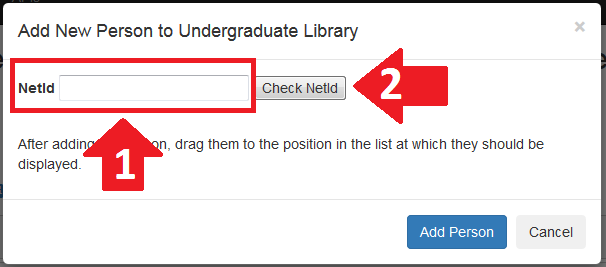
In the pop-up box, type the person’s NetID and click the “Check NetId” button.
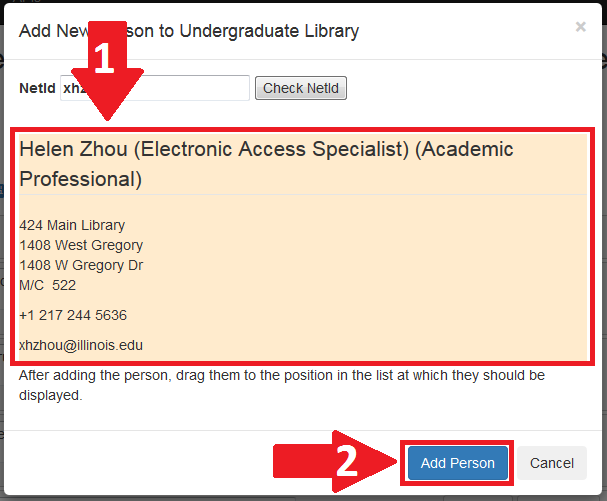
When the record is found, click the “Add Person” button to add the person to the directory database.
The new entry is added at top of the list.
Drag the entry to the appropriate position. Scroll down to the bottom of the page and click the Save Changes button. Go to your WordPress site and refresh the Contact page, you’ll see that the person has been added.
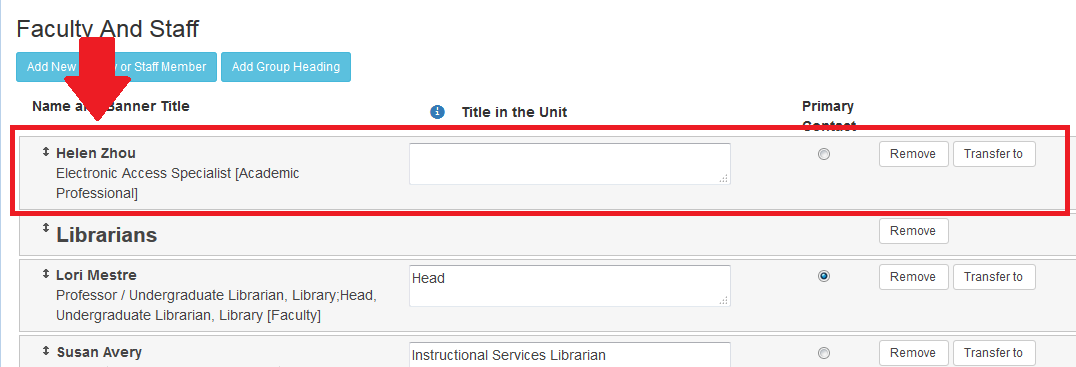
Employee Transferred to Another Unit
If an employee listed on the Contact page works in another unit, go to the Library Directory, on the “Edit Staff” page, find the person’s entry and click the “Transfer to” button.
![]()
A “Select a Unit” drop-down menu appears next to the “Transfer to” button, select the unit that the employee is currently working for.
![]()
![]()
Scroll down to the bottom of the page and click the Save Changes button. Go to your WordPress site and refresh the Contact page, you’ll see that the person has been removed from the page. If you look at the Contact page of the other unit, you’ll see that the employee displays on that list now.
How to Remove a Person
If an employee no longer works in the library, use the AD Group Manager to remove him or her from your unit’s AD groups, and then in the Library Directory, find the person’s record on the “Edit Staff” page, and click the “Remove” button.
![]()
A message pops up and warns you that the person will be deleted from the directory database, click OK.

Scroll down to the bottom of the page and click the Save Changes button. Go to your WordPress site and refresh the Contact page, you’ll see that the person has been removed from the list.
If an employee has left the University, an exclamation mark in a red circle appears next to the person’s name. When you hover the mouse over the icon, a message shows “This person left the university on….“. You’ll notice that there is no job title information either. Click the “Remove” button, and then click “OK” when prompted by the warning message. Scroll down to the bottom of the page, click the Save Changes button. The person will no longer be listed on the Contact page.
![]()
Troubleshooting Tips
Possible cause 1: the Contact page hasn’t been published.
In WordPress, click “Pages” in the left navigation pane, and find the contact page, you’ll see that it’s labeled as “Draft” and there is a “Preview” instead of “View” option.

Publish the page, then refresh your browser, the employee list will load after a few seconds.
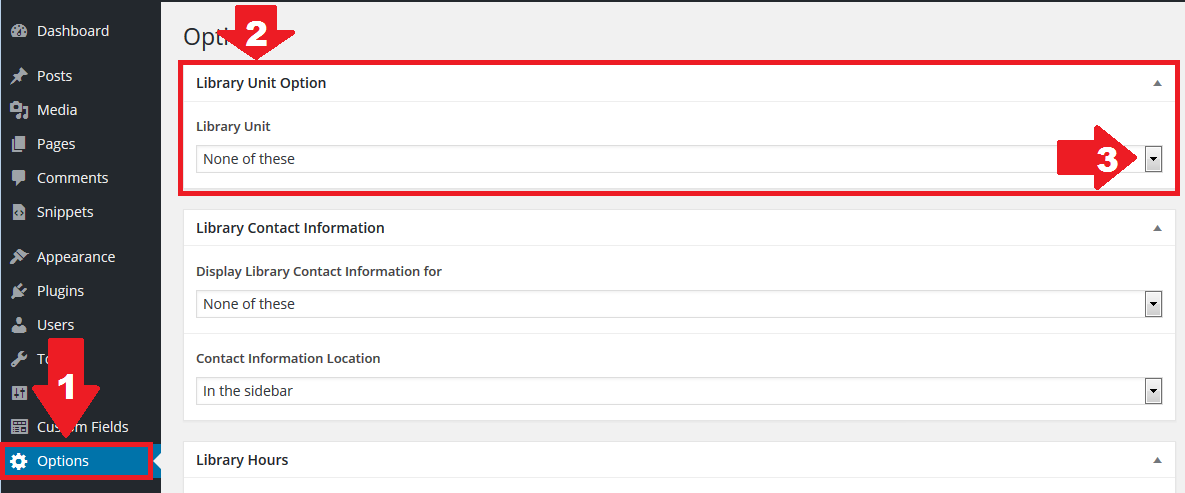
Possible cause 2: the Contact page hasn’t been configured.
In your WordPress site, click “Options” in the left navigation pane, under “Library Unit Option“, you’ll see “None of These” is selected for the “Library Unit” field, click the drop-down arrow and select the appropriate unit, then click the “Update” button to publish the change.
Go back to the Contact page, refresh the browser, after a few seconds the employee list will display.
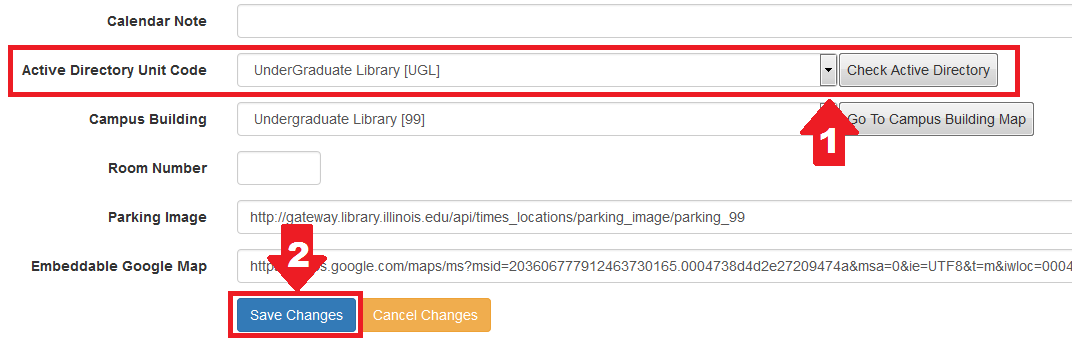
Possible cause 3: the unit AD group hasn’t been mapped in the Library Directory.
Go to the Library Directory website, find your unit, click the “Edit Unit” link in the Actions column, on the “Edit Library Unit” page, scroll down to the “Active Directory Unit Code” field, click the drop-down arrow and select your unit, then scroll down to the bottom of the page and click the “Save Changes” button. Refresh the Contact page, the employee list will load after a few seconds.
If none of the above steps has resolved the issue, please send an email to webmaster@library.illinois.edu, a web team member will contact you soon.
Possible cause 1: the unit AD group hasn’t been mapped in the Library Directory.
Go to the Library Directory website, find your unit, click the “Edit Unit” link in the Actions column, on the “Edit Library Unit” page, scroll down to the “Active Directory Unit Code” field, click the drop-down arrow and select your unit, then scroll down to the bottom of the page and click the “Save Changes” button. Log off the Library Directory and then log back on, you should see the “Edit Staff” option in the Actions column now.
Possible cause 2: you’re not an OU Admin of your unit’s Active Directory groups.
Please ask your unit head to log a ticket and request the Library IT to give you the OU Admin permission.
In the Library Directory, click “APIs” in the top menu, scroll down to the bottom of the page and click “Flush cached data” under “Admin Functions“. Refresh the Contact page to see if the changes are effective. Please note, it may take up to 5 minutes for the various systems to synchronize.