by Kimberly Lerch | Published: June 4, 2020
As promised, I present to you not only some representative recipes taken from the Illinois Digital Newspaper Collections highlighting the Rodney Dangerfield of vegetables, salsify, but pictures of the dishes and opinions of those lucky enough to eat and critique them!
Salsify recipes are aplenty; when I searched the IDNC for ‘salsify’ and ‘recipe,’ 71 hits were returned! After checking those results there appears to be about four different ways salsify was prepared: croquettes/fritters (fried), boiled and served in a white or cheese sauce, mock oyster soup, and scalloped (baked).
A couple of themes reappear in each of the many recipes. It must be parboiled before using it whether eventually fried, baked, coated in a sauce, or highlighting a soup. It’s best to use only butter when preparing it (one recipe does offer the other choices of olive oil or ‘pork drippings’) and season it well with salt and pepper.
I ordered a six-pack of canned salsify since I couldn’t find any raw salsify in the area.
Here are just a few examples from the many authentic, historic recipes from the Illinois newspapers.
Salsify Fritters/Croquettes [1]

I’ve tried to update this recipe to measurements and ingredients that are currently used. Note that one quart is equal to four cups, one pint is equal to 2 cups.
4 cups of raw salsify, or 2 cans
2 cups flour
2 tsp. baking powder
½ tsp. salt
2 eggs, beaten
Whole milk, as needed—have at least a cup at hand but don’t add it all at once; you may not need that much
Salt and pepper, to taste
1 Tbsp. your choice of oil: butter, olive, vegetable, bacon
I cut the recipe in half (I ain’t feedin’ the farmhands), so I used just one can of salsify.
- Drain the salsify and mash it in a bowl. It’s so soft that a fork or a pastry cutter will get the job done. In separate bowl, mix the flour, baking powder and salt together well.
- Beat 1 egg in yet another bowl (dirtying every dish in the kitchen as my mother would say) and then add it to the flour mixture.
- Add enough milk (a little at a time—you can always add more, but you can’t remove it) and stir it in well until the batter “plops” off of the spoon (not so thick that it sticks to the spoon, not so thin that it pours). Add the mashed salsify to this egg-milk-flour mixture and mix thoroughly. Shake in a little more salt and add some pepper to it for good measure.
- Put your choice of oil in a frying pan and start to heat it up. To test the oil, put a pinch of the batter into it; if it sizzles immediately upon contact, the oil is ready–turn down the heat a bit then. Carefully drop (no spattering!) the salsify mixture into the oil by the heaping spoonful. When browned on one side, flip it over and continue frying until the other side is browned.
- Transfer them from the pan to a plate covered with a paper towel or two to absorb any excess oil.
- Serve them right away. Leftovers, if there are any, should be refrigerated, but they don’t reheat well; they lose their crispness.
Critique:
The newspaper doesn’t lie—THESE ARE GOOD! They are crispy on the outside, fluffy on the inside, and flavorful with just the salt and pepper to season. The baking powder and egg give the patties their rise. Taste Tester #1, Taste Tester #2, and I loved them. They had good flavor, good texture, and were not a bit greasy (if you have the oil at the right temperature the oil will cook the patty, not soak into them). The only thing I can think that would make these croquettes better would be some onion in them. And that’s just what I’m going to do the next time I make them, and I AM going to make them again.
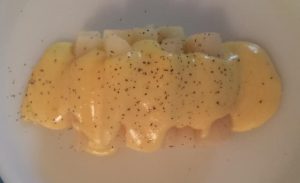
Salsify in a Cream Sauce [2]
Salsify
Cheese sauce
2 Tbsp. butter
2 Tbsp. flour
1 cup milk
1 cup cheddar cheese
Salt and pepper, to taste
- Take as much raw salsify as you believe you and your family will eat and wash, scrape and quarter it. By quartering, I mean that you are to cut the salsify twice lengthwise for long, thin salsify spears.
- Put the salsify in a pot, cover it with water (not too much) and boil it until the spears are tender (a fork can easily poke through them).
- While the salsify is boiling, prepare your favorite white sauce (you can even add cheese for a cheese sauce).
- Drain the salsify and arrange the spears all in the same direction (we’re aiming to impress with the presentation).
- Drizzle the sauce over salsify. As the recipe states, it can be served over toast (creamed beef style), where S.O.S. would stand for Salsify on a Shingle (instead of the other term)!
When made in a modern kitchen and from a can, you can either microwave the salsify in its juices for about a minute and a half to two minutes (depending on your microwave wattage) or boil it in a saucepan on the stove (another dirty pan!).
Critique:
I decided to make a cheese sauce for this dish. I’m glad I did. Naked, boiled salsify is, well… bland. It was the cheese sauce that made this dish. The salsify just kind of came along for the ride. It looked pretty with its cheesy drizzlings and peppery specks, but it was lackluster. Canned salsify, as with other canned vegetables, tend towards to the mushy and that’s not a texture I want in my food. Taste Tester #1 and Taste Tester #2 sadly agreed with me.
Mock Oyster Soup [3]

Again, ingredient amounts are not given! The amount of salsify you have on hand to cook with will dictate how much and how strong a soup you will make.
Salsify, washed, scraped, and sliced or diced. The larger you slice/dice the salsify, the longer it will have to boil.
- Put the salsify (sliced or diced) into a pot add enough water (or chicken broth—I do this for my potato soup) to cover it. Boil until a fork pokes right through the salsify. When it is tender, pour off some of the water/chicken broth.
- Add enough milk or cream (or a bit of both) to the pot to make the amount of soup you want. Add butter to the soup (as little or as much as you want, I threw in about a ¼ stick of REAL butter). Season with salt, pepper, paprika (optional—but USE it) and celery salt (optional—but USE it and cut back on the regular salt). Heat it slowly so that the milk doesn’t scald.
- As soon as the soup is hot (you do not want a cream soup to boil) you can thicken the soup. Take out some (or all if you don’t want any chunks) of the salsify, puree them and return them to the pot or, take out about a cup of soup, add a tablespoon of flour or corn starch to it, stir, and then return the thickened cup of soup back into the pot. If you thickened the soup (either way), cook the soup for another 10 minutes.
Critique:
Let me preface my critique of this soup by telling you I love cream of potato soup. This is as good or, dare I say it, better than the best cream of potato soup I’ve made. It was creamy, buttery, but the taste of the salsify was front and center in this dish; it was very flavorful. Using broth intensifies the flavor but doesn’t overpower the vegetable. You don’t eat it and say, “Oh, there’s the chicken.” I will be making this soup again. It’s going in the family rotation. Did you notice I threw a few oyster crackers in the soup? They’re tasty and, hey, this is mock OYSTER soup; why not?
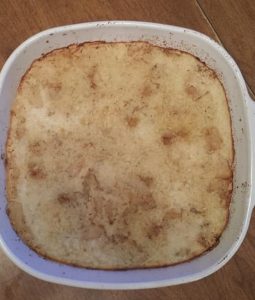
Scalloped Salsify[4]
Salsify
Butter
Milk
Salt
Pepper
- Wash off the salsify but don’t peel it, put it in a pot and cover it with water. Boil until a fork pokes through it and THEN peel the skin off the spears (doing it backwards from the previous raw salsify methods where they have you peel it, then boil it—showing the cook there are two ways to skin a salsify!).
- Slice the salsify crosswise into ½ inch ‘coins.’ I used the canned salsify, so all I had to do was the slicing.
- Either way, grease a casserole dish (size depends on how much salsify you have; for one can, I used a 9” x 9” glass casserole). Cover the bottom of the dish with half of the salsify. Season it with salt and pepper, dot it with butter, and then sprinkle breadcrumbs (I used Panko) on top. That’s layer one. Repeat for layer two.
- Pour enough milk over what’s in the dish to cover the ingredients (don’t drown it!) and bake. No temperature or time is given, but I assumed 350 degrees Fahrenheit and I checked it after about 20 minutes. I let it go for another 10 minutes (for a total of a 30-minute bake). You want the breadcrumbs to absorb the hot milk and the butter to have melted and flavored up the salsify. A browned, crispy topping is pretty and pretty tasty too.
Critique:
I love scalloped and au gratin potatoes (let’s face it: I love anything Potato). I was hoping this would be just like that. It was not. I thought the flavor was subtle, my Taste Tester #1 thought it was bland, but Taste Tester #2 thought it was so good they had two helpings! I had the same problem with this as I did the salsify in the cheese sauce; the texture of the canned vegetable was too mushy, but the sauce and crisped breadcrumbs were delicious. I’d like to give it another go with fresh salsify, hoping that the vegetable, although cooked, would retain some ‘tooth’ to it because the flavor was worth it.
Overall, the winners were definitely the fritters and the soup; they came in first and second place for all of us (Taste Tester #2 puts fritters first, Taste Tester #1 and I feel the soup is #1). All agreed that the scalloped salsify was a solid third and would benefit with onions added for added flavor. All also agreed on placing the salsify in a cheese sauce in last place; not even a scratch cheese sauce could help those mushy roots laying there on the plate!
Future of Salsify
What else can I say about salsify? Salsify was never a staple like other root vegetables of the American kitchen and it seemed to virtually disappear from our tables by the mid-20th century in the United States. But the folks in the United Kingdom are putting it back on their tables.[5] Maybe, because of this post, I have encouraged you to get a can or two or, if you’re lucky enough to be able to get your hands on some fresh salsify, to try out these recipes too. Use the recipes as a starting point and experiment with different seasonings and add in other vegetables—that’s what I’m going to do!
Help with Text Correction
The newspapers in the Illinois Digital Newspaper Collections are searchable because of computer-generated text that underlies the page images. This computer-generated text is far from perfect! You can help improve the accuracy of keyword searches by correcting errors. Thanks to the hard work of volunteer text correctors, more than a million lines of text have been corrected so far.
Register to become a text corrector.
Learn more about how to help correct newspaper text.
Notes:
[1] “Salsify Fritters are Good,” True Republican, November 13, 1907, https://idnc.library.illinois.edu/?a=d&d=STR19071113.2.41&e=——-en-20–1–img-txIN———.
[2] “Salsify or Oyster Plant,” Wallace’s Farmer, April 14, 1922, https://idnc.library.illinois.edu/?a=d&d=WAF19220414.2.58&e=——-en-20–1–img-txIN———.
[3] “With an Oyster Flavor,” The Urbana Daily Courier, June 4, 1912, https://idnc.library.illinois.edu/?a=d&d=TUC19120604.2.21&e=——-en-20–1–img-txIN———.
[4] “Palatable Dishes for the Spring Table,” Western Rural and Livestock Weekly, April 7, 1898, https://idnc.library.illinois.edu/?a=d&d=WRL18980407.2.43&srpos=1&e=——-en-20-WRL-1–img-txIN-%22palatable+dishes+for+the+spring%22——–.
[5] Wade, Prudence, “Salsify: The Little-Known Victorian Root Vegetable That’s Making a Comeback,” Independent, https://www.independent.co.uk/life-style/food-and-drink/salsify-root-vegetable-taste-recipe-what-is-it-waitrose-albert-bartlett-a8631251.html Accessed 5/3/2020.